Cloudbeds Integration
Connect your Touch Stay and Cloudbeds accounts to import Cloudbeds accommodations & reservation data into your guides and make it easier to share guides with your guests.

The steps to complete your integration:
- Step 1: Connect your Touch Stay & Cloudbeds accounts
- Step 2: Match Cloudbeds Accommodations
- Step 3: Import Cloudbeds Accommodations
- Step 4: Complete guide creation (new Touch Stay customers only)
- Step 5. Personalisation settings
- Step 6: Sync Reservations
- Step 7: Sharing guide links through Cloudbeds
- Best Practice: Sharing Your Guide
Step 1. Connect your accounts
Go to Integrations in your Touch Stay account, go to the Partners tab, and click “Connect" underneath the Cloudbeds logo. This will take you to the Cloudbeds authorisation screen, where you confirm giving access to Touch Stay.
Step 2. Match Accommodations
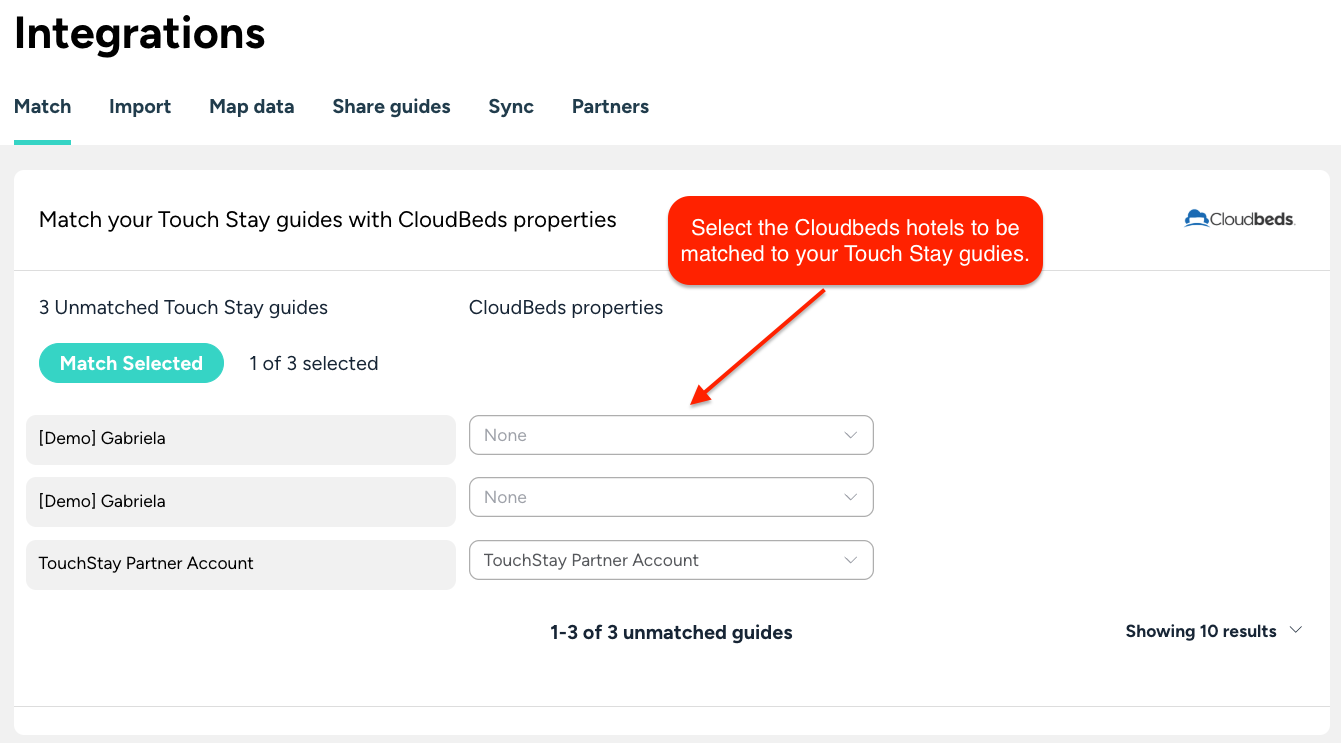
Once authorised, you can match any existing Touch Stay guides to your Cloudbeds accommodations. Go to the Match tab on the Integrations page.
Use the drop-downs to select the correct Cloudbeds accommodations for each Touch Stay guide. When complete, click “Match Selected”. If you don’t see any guides on this step, then you can move directly on to Step 3.
Step 3. Import Accommodations
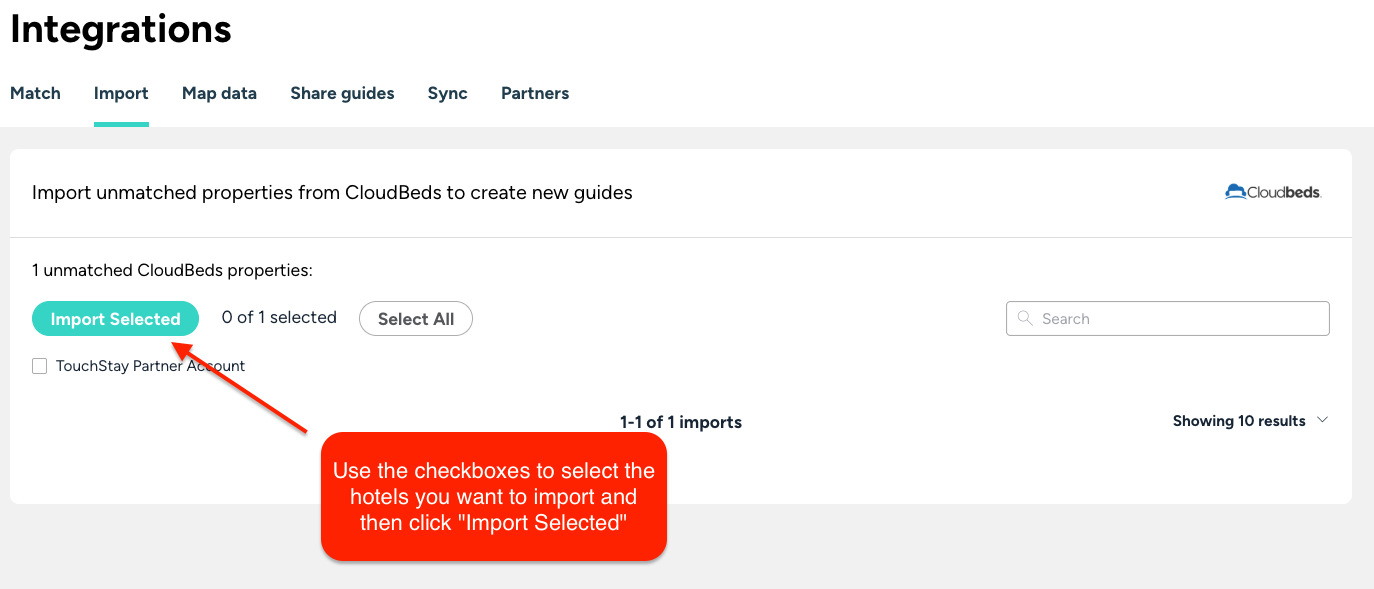
If you have any remaining unmatched accommodations from Cloudbeds, then the next screen allows you to import those into Touch Stay.
Go to the Import tab on the Integrations page. Check the ones you want to import and click the “Import Selected” button.
Touch Stay will import the following:
- Property Name
- Property Address
- Cover photo
Each property imported will create a new Touch Stay guide.
Step 4. Complete guide creation (new Touch Stay customers only)
Matching or importing accommodations won’t automatically start syncing reservations from Cloudbeds, so now is the time to check the content of your guides and make sure they’re ready before you sync reservations with Cloudbeds.
If you’re new to Touch Stay, then check out the Getting Started page for hints and tips on the quickest way to build out your welcome book content.
Step 5. Personalisation settings
You can map Cloudbeds accommodation and reservation data fields to your Touch Stay custom fields or topic customisations.
This allows you to automatically personalise your guides and guest messages for each reservation, for example, by showing the guest’s name or stay dates inside your welcome book.
The steps below explain how to map and sync reservation data from Cloudbeds to your Touch Stay account.
If you’d like to learn how to map accommodation data (for deeper guide-level personalisation), see our related article: Guide level data mapping with Cloudbeds
Automatically Mapped Fields
The following Cloudbeds reservation fields are automatically linked to standard field codes in your Touch Stay account:
| Field | Data Type |
|---|---|
| Guest first name | Text |
| Guest last name | Text |
| Arrival date | Number |
| Departure date | Number |
| Guest contact phone number ⚠️ | Number |
| Guest contact email address ⚠️ | Text |
⚠️ Note: Some OTAs or booking sites don’t always provide the guest’s phone number or email address, so these details may vary depending on where the booking came from.
Optional Fields You Can Manually Map
These additional Cloudbeds reservation fields are available through the integration and can be manually mapped to your own Touch Stay custom fields:
| Field | Data Type |
|---|---|
| Accommodation Features | Text |
| Accommodation Description | Text |
| Accommodation Short Name | Text |
How to Map Custom Fields
- Go to the Integrations page.
- Open the Map Data tab.
- Click + Add New Mapping.
- Select the Cloudbeds field you want to connect.
- Choose a name for your custom field code and, if needed, add a substitute value.
- 💡 Tip: Substitute values are used when data from custom fields is missing at the time the field code is used
- For example, if a custom field, such as Accommodation Features, isn’t provided, you could display a message like “Contact us if this information is missing.”
- 👉 Learn more in our article: Field Codes Explained
- 💡 Tip: Substitute values are used when data from custom fields is missing at the time the field code is used
- Once your custom fields are mapped, any future reservations synced from Cloudbeds will automatically populate those fields on the Touch Stay Invitation record.
💡 Tip: You can then use this data in your Message Hub templates and guide content to personalise the guest experience.
Step 6. Sync reservations
Once your guides are ready, you can start syncing with Cloudbeds.
Go to the Sync reservations tab on the Integrations page. Select the guides you want to sync using the checkboxes.
Use the “Select All” option at the top right of the page to select all in one go. Click Sync selected to submit.
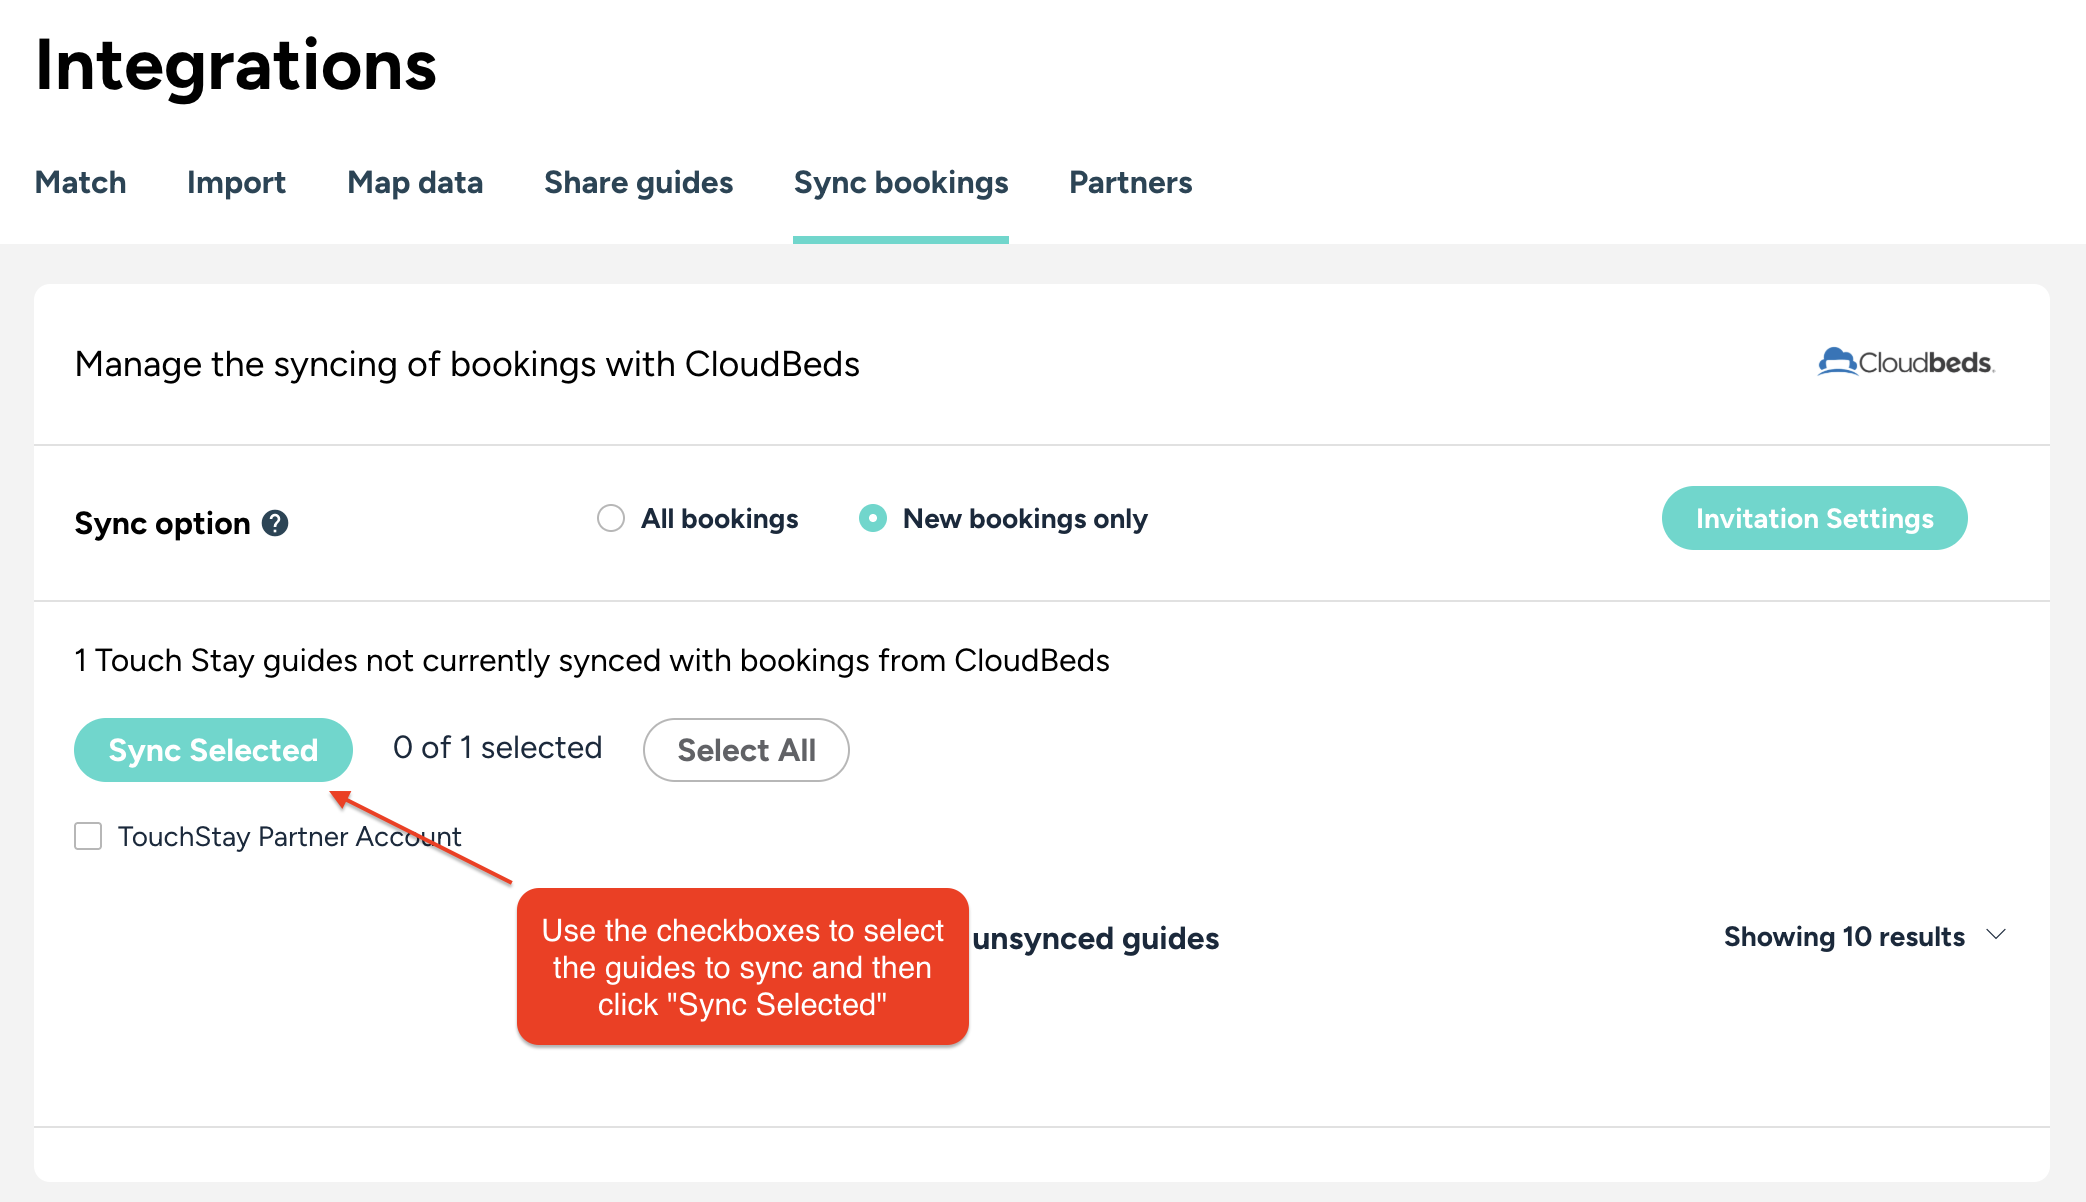
Here, you can choose whether to import all your future reservations or have Touch Stay only import new reservations.
- If you are new to Touch Stay, then choose the “All reservations” option
- If you are already using Memo, Touch Stay's guest messaging tool, before you connect your Cloudbeds account, then it's best to choose the option “New reservations only” to prevent duplicate reservations from being imported.
Next, select the guides to start syncing by using the checkboxes (note the “Select All” option at the bottom left) and click Submit.
If you have selected “All reservations,” then all your future-dated reservations from Cloudbeds will now be imported and will generate invitations and schedule email or SMS messages based on the reservation details and your Touch Stay message template schedules. All future reservations for guides with the sync active will also now be imported automatically.
A note on Multi-Accommodation Reservations
**Please note that if a single reservation contains multiple accommodations booked for the same dates, Touch Stay will only create one invitation per reservation (typically for the first/main accommodation listed). This is due to the limitation of custom fields available per reservation within the system.
The Workaround: If you need a unique invitation for every single accommodation, they must be booked as individual, separate reservations within Cloudbeds.
Step 7. Sharing guide links through Cloudbeds
Touch Stay sends the unique link for each reservation back to Cloudbeds. You can then add this to any Cloudbeds message templates and automate the sending of the guide link through the Cloudbeds unified inbox.
Your Cloudbeds account will have a new custom field created for Reservations called:
[cf-{42819}|Touch Stay Guide].
In your Cloudbeds settings, go to Email > Templates > Edit Templates.
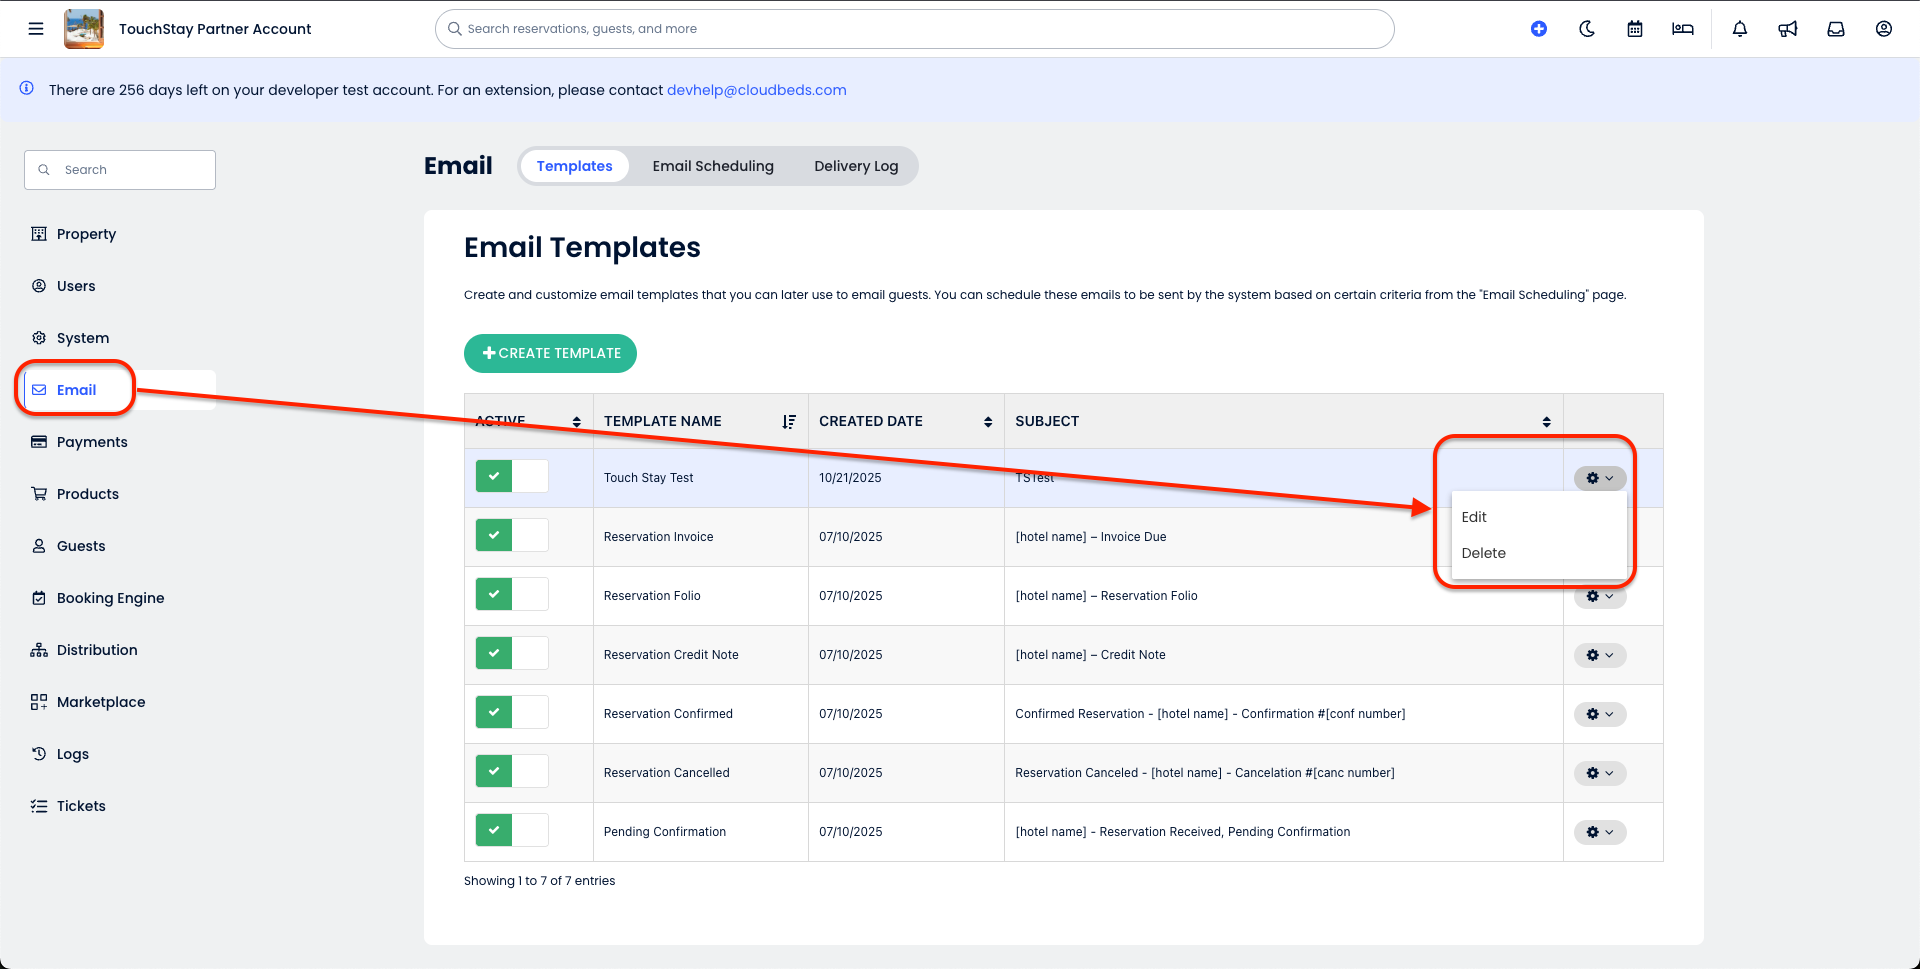
In the Email template screen, place your cursor where you would like the guide link to go, click the drop-down menu on the message editor, select [cf-{42819}|Touch Stay Guide], click 'Insert', and then hit 'Save'.

And that’s it! Simply use the above to add the link to your Cloudbeds message templates as part of your communication flow with your guests.
Best Practice: Sharing Your Guide
A note about Cloudbeds' message timing
There may be a short delay between a booking arriving in Cloudbeds and the guide link being returned from Touch Stay while both systems process the data.
💡 Recommendation:
Avoid adding the [cf-{42819} |Touch Stay Guide] field to messages that send immediately after a booking is received.
Instead, schedule a message about 1 hour later (or even the next day) to introduce your guests to everything they’ll find in your guidebook.
When and how to share the Touch Stay guide link (via Cloudbeds)
We usually recommend this setup for the best guest experience:
-
First message – after booking confirmation
When: Around 1 hour after the booking
Why: Avoids sending the guide too early and ensures everything is ready
-
Reminder message – before arrival
When: A few days or weeks before arrival
Why: Encourages guests to review house info and plan ahead
-
Final reminder – close to arrival
When: 1 day before arrival
Why: Ideal for check-in instructions and arrival details
What happens if I’m already using Memo?
If you want to switch from Message Hub to Cloudbeds for sending guide links:
- Archive your existing Message Hub message templates; this stops them from being added to new reservations.
- Set up your new Cloudbeds message flow.
-
Archiving won’t affect any existing invitations.
To cancel messages already scheduled, delete the Message Hub template instead.